| Töltsd le és telepítsd a nélkülözhetetlen betűtípusokat(s) Hogy megtekinthesd a Szanszkritot annak teljes fényében Olvass Transzliteráció (2) (magyar) hogy teljes mértékben átlásd a transzliterációs rendszert |
Tanulj Szanszkritul - Első vonások 1
A Szanszkrit magánhangzók rajzolása
Introduction
This document has been published as a support for Writing. In Writing, you learnt how to write in Szanszkrit. Now, you will learn how to draw every letter properly. Apart from the well known letters, you will learn how to draw a number of important Conjuncts.
Very important: The horizontal line in Szanszkrit is always drawn in the end. In short, you write all characters comprising a word or a compound, and lastly you draw the horizontal line. However, when you draw a single letter or conjunct with some strokes on top of the horizontal line (e.g. "ai"), you will draw those strokes in the end. Still, the horizontal line is generally drawn when you finish writing. Why? Because it would be really annoying to draw a short horizontal line for every character, and then to join these lines together.
Therefore, when you draw a single character with some strokes on top of the horizontal line, it is OK to draw those strokes in the end (after the horizontal line). Nevertheless, remember always that when you write words and compounds, you must draw the horizontal line in the end. Got the point? Well done.
Drawing initial Vowels
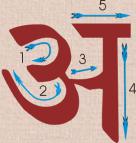
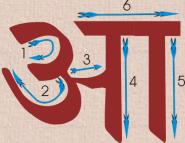
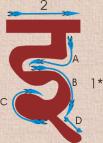
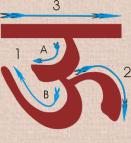
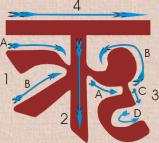
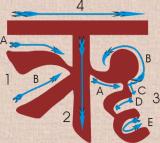
Szanszkrit language is written from left to right, just as English is. No problem about it. The order of each stroke is designated by a number. Follow the numbers and enjoy yourself.
Let's get down to work.
 |
 |
 |
 |
| a No comments |
ā No comments |
i (*It is a single stroke composed of different sub-strokes --A, B, C and D--. The same procedure will be used in other letters.) |
ī (Note that the curve on top of the horizontal line is drawn in the end because this a single isolated character.) |
 |
 |
 |
 |
| u No comments |
ū No comments |
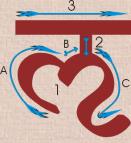
ṛ (Although the sub-stroke B of the stroke 3 is going around an "apparent" circle, this circle is really a "curl". The "apparent" circle was formed from the superimposition of the "thick" curved stroke.) |
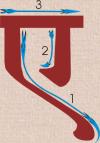
ṝ (Although the sub-stroke B of the stroke 3 is going around an "apparent" circle, this circle is really a "curl". The "apparent" circle was formed from the superimposition of the "thick" curved stroke.) |
 |
 |
 |
 |
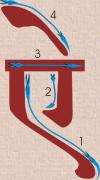
| ḷ (The stroke 1 is formed from the sub-strokes A, B and C, while the stroke 2 is the "short" downward vertical line.) |
e No comments |
ai No comments |
o No comments |
 |
 |
 |
|
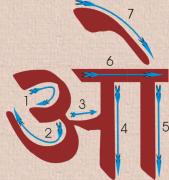
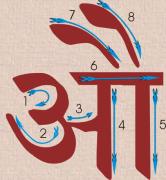
| au (Strokes 7 and 8 really convene --without touching each other-- on the second vertical line --stroke 5--. Since these strokes are thick the aforesaid convergency is barely observed here.) |
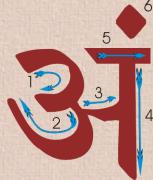
aṁ (Although the stroke 6 looks like a diamond --due to the pen being used--, it is really a simple dot.) |
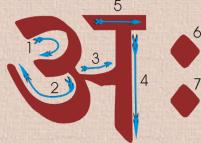
aḥ (Although the strokes 6 and 7 look like a couple diamonds --due to the pen being used--, they are really two simple dots.) |
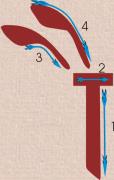
Drawing Vowels coming after consonants
These are the characters for the vowels coming after consonants:
 |
 |
 |
 |
| ā No comments |
i No comments |
ī No comments |
u (Of course, this character is actually much more little. It has been enlarged for the sake of convenience.) |
 |
 |
 |
 |
| ū (Of course, this character is actually much more little. It has been enlarged for the sake of convenience.) |
ṛ (Of course, this character is actually much more little. It has been enlarged for the sake of convenience.) |
ṝ (Of course, this character is actually much more little. It has been enlarged for the sake of convenience.) |
ḷ (Of course, this character is actually much more little. It has been enlarged for the sake of convenience.) |
 |
 |
 |
 |
| e No comments |
ai (Both of strokes really convene --without touching each other--. Since these strokes are thick the aforesaid convergency is barely observed here.) |
o No comments |
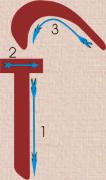
au (Strokes 3 and 4 really convene --without touching each other-- on the vertical line --stroke 1--. Since these strokes are thick the aforesaid convergency is barely observed here.) |
Concluding remarks
I have attempted to teach you how to draw Szanszkrit vowels in a simple manner. I expect to have succeeded in doing so. Note that the previous characters were drawn by using a thick pen. So, when you use a simple pen the resulting characters maybe will not be as artistic as these ones. Relax your hand while drawing every stroke. Draw characters for the sake of joy, not as mere homework. It is not a struggle either. Drawing Szanszkrit characters should be a joyful activity. Thus, you will be using your emotional center in a proper way. No use writing Szanszkrit if you are not able to feel joy in doing so.
Well, this document is finished. I will teach you how to draw Szanszkrit consonants later on.
Further Information
Ezt a dokumentumot Gabriel Pradīpaka, a website egyik társalapítója készítette, aki spirituális guru és aki a Szanszkrit nyelv és a Trika filozófiai rendszerben jártas.
Szanszkrit, Yoga és indiai filozófiával kapcsolatosan, vagy ha csupán hozzászólni, kérdezni szeretnél, esetleg hibára felhívni a figyelmet, bátran lépj kapcsolatba velünk: Ez az e-mail címünk.
